|
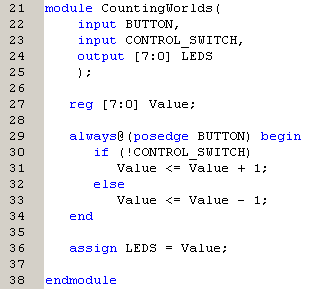
Create a new project and copy and paste your Verilog file from the "Counting Worlds" module into your new project directory. Then add it as a source by selecting 'Add Source' instead of 'New Source' from the drop down menu.
For this module we are going to use the on-board clock to increment a register once every second. The on-board clock has three settings, 25MHz, 50MHz and 100MHz. We are going to use the 50MHz version. (Note that some boards may not have been properly populated, and hence have no pins to place jumpers on. If this is the case then the board defaults to 50MHz). Because the clock is so fast compared to the rate in which we wish to count (50 million times faster), we need to have a mechanism that can take the 50MHz input and produce an impulse once per second to indicate it is time to increment the counter.
The easiest way to do this is to include a second internal counter that increments once per clock cycle, and resets itself when it reaches 50 million. This requires a second register, but how wide does the register bus have to be to be able to represent a number as large as 50 million? Once you figure it out add the new register, giving it an appropriate name.
Now we need to amend the interface. The module name does not need to change, but it might be a good idea. However, the interface list certainly does need some change, as the BUTTON is now replaced by a clock 'CLK', and we also need to have a 'RESET' push button input as well as a 'COUNT_ENABLE' slide switch. Once this is done, only the internal logic that dictates how the inputs affect the registers needs to be defined.
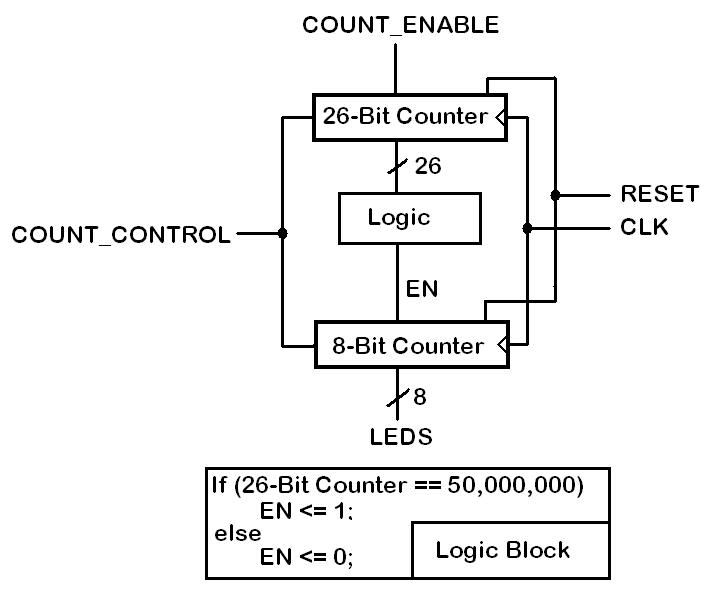
Because we have two counters, we can divide the synchronous logic into two processes (two different always@(...) statements), which are covered in the next two sections.
|